Nginx搭建流媒体服务器
如今直播非常流行,所以最近研究了下直播相关的知识。自己也在阿里云免费开通了直播相关的业务,但是使用阿里云的流媒体服务器会根据用量进行收费。所以自己想了下,能不能自己来搭建一个流媒体服务器,百度了下,哇哦!不错哟!居然Nginx就可以搭建流媒体服务器。Nginx作为常用的Web服务器,大家都很熟悉,所以本文就是主要介绍Nginx如何搭建流媒体服务器。
Nginx搭建流媒体服务器主要是需要nginx-rtmp-module模块。Github地址:https://github.com/arut/nginx-rtmp-module
安装步骤:
1、首先使用git克隆nginx-rtmp-module
[root@localhost ~]# git clone https://github.com/arut/nginx-rtmp-module.git
2、下载Nginx源码包
[root@localhost ~]# wget http://nginx.org/download/nginx-1.15.3.tar.gz
3、解压安装包,并进入解压后的目录
[root@localhost ~]# tar -zxf nginx-1.15.3.tar.gz
[root@localhost ~]# cd nginx-1.15.3
4、安装相关依赖
[root@localhost nginx-1.15.3]# yum -y install gcc gcc-c++ autoconf automake make openssl openssl-devel pcre pcre-devel
5、编译和安装
[root@localhost nginx-1.15.3]# ./configure --prefix=/apps/nginx-1.15.3  --add-module=../nginx-rtmp-module  --with-http_ssl_module
#以上需要添加nginx-rtmp-module模块
[root@localhost nginx-1.15.3]# make && make install
6、编辑Nginx的配置文件nginx.conf
[root@localhost ~]# vim /apps/nginx-1.15.3/conf/nginx.conf

#文件最后新增如下配置信息,必须在http块同层去添加,一定不要添加到http块内了,该配置主要用于推流使用
rtmp {
    server {
        listen 1935;  #监听的端口
        chunk_size 4000;
        application hls {  #rtmp推流请求路径
            live on;
            hls on;
            hls_path /hls;#我这里放在了根目录下,自行修改,该目录必须具有可读可写权限
            hls_fragment 5s;
        }
    }
}

#在http块中添加server,这个必须在http快中添加,切记
server {
    listen       8111;
    server_name  localhost;
    location / {
        root   /; #该位置为上面hls_path的上级目录地址
        index  index.html index.htm;
    }
    error_page   500 502 503 504  /50x.html;
    location = /50x.html {
        root   html;
    }
}
保存修改后,可以使用如下命令检查nginx配置文件
[root@localhost ~]# /apps/nginx-1.15.3/sbin/nginx -t
nginx: the configuration file /apps/nginx-1.15.3/conf/nginx.conf syntax is ok
nginx: configuration file /apps/nginx-1.15.3/conf/nginx.conf test is successful
启动Nginx
[root@localhost ~]# /apps/nginx-1.15.3/sbin/nginx #启动nginx

[root@localhost ~]# ps -ef|grep nginx #查看nginx进程信息
root      13818      1  0 18:58 ?        00:00:00 nginx: master process /apps/nginx-1.15.3/sbin/nginx
nobody    13819  13818  0 18:58 ?        00:00:00 nginx: worker process
nobody    13820  13818  0 18:58 ?        00:00:00 nginx: cache manager process
root      13822  13767  0 18:58 pts/2    00:00:00 grep --color=auto nginx

[root@localhost ~]# netstat -ntlp|grep nginx #查看端口信息,下面的1935和8111端口都有了,说明配置OK
tcp        0      0 0.0.0.0:1935            0.0.0.0:*               LISTEN      13818/nginx: master
tcp        0      0 0.0.0.0:8111            0.0.0.0:*               LISTEN      13818/nginx: master
tcp        0      0 0.0.0.0:80              0.0.0.0:*               LISTEN      13818/nginx: master
以上我们nginx搭建流媒体服务器就算完成,下面我们需要来测试下该流媒体服务器能否正常使用呢?这里我们需要设计两个知识点:
1、推流端(自己编写、其他工具如OBS)
2、拉流端(自己编写、video标签、其他工具)
这里我测试主要使用OBS作为推流端、使用video标签作为拉流端播放
一、OBS推流
官网地址:https://obsproject.com/
对应自己平台下载对应的版本,我这里使用的是windows,所以下载地址为:
https://cdn-fastly.obsproject.com/downloads/OBS-Studio-22.0.2-Full-Installer-x64.exe
安装方式:傻瓜式安装
配置方式:
设置->流->流类型选择(自定义流媒体服务器)->URL(配置的流媒体服务器地址)->流名称(随意指定,拉流的时候需要使用)
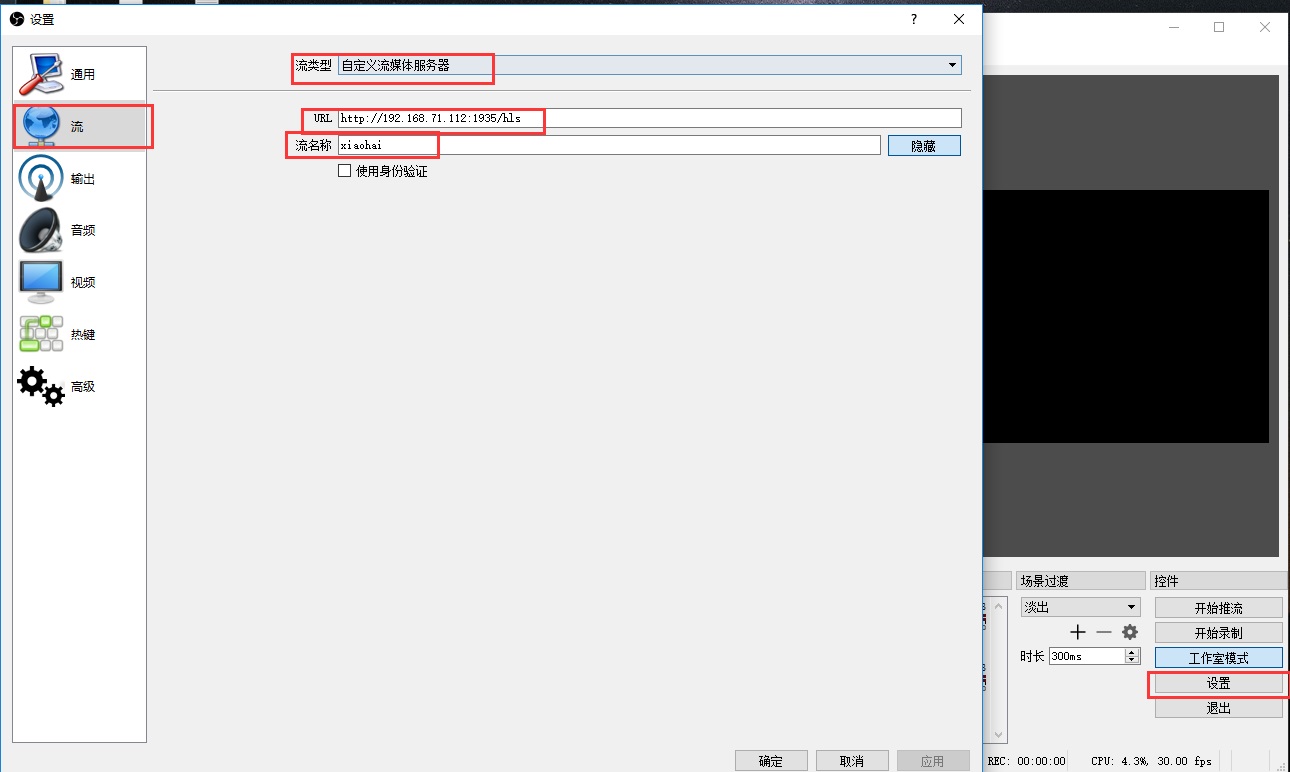
配置好后就确定保存,然后可以点击开始推流。
二、使用H5标签video进行拉流
#在80端口所在的目录下新建一个test.html
[root@localhost html]# vim /apps/nginx-1.15.3/html/test.html #保存如下内容

<video>
    <source src="http://192.168.71.112:8111/hls/xiaohai.m3u8"/>
    <p class="warning">Your browser does not support HTML5 video.</p>
</video>

#上面的地址中http://192.168.71.112:8111/hls/xiaohai.m3u8根据我们自己在OBS上的流名称来决定
以上都可以后,就可以使用手机浏览器打开这个网页,我这里是:http://192.168.71.112/test.html,如果可观看视频,说明整套流程全部完成,如果读者感兴趣,可以去/hls目录下看下里面文件的变化,这里就不进行说明了。
热门标签
每日一句
-
对一个尚未成熟的少年来讲,坏的伙伴比好的老师起的作用要大得多。
——伊索
今日排行
- Docker编译出现:temporary error (try again later)
 Docker编译镜像出现:fetch http://dl-cdn.alpinelinux.org/alpine/v3.12/main/x86_64/APKINDEX.tar.gz
ERROR: http://dl-cdn.alpinelinux.org/alpine/v3.12/main: temporary error (try again later)
WARNING: Ignoring APKINDEX.2c4ac24e.tar.gz: No such file or directory问题
Docker编译镜像出现:fetch http://dl-cdn.alpinelinux.org/alpine/v3.12/main/x86_64/APKINDEX.tar.gz
ERROR: http://dl-cdn.alpinelinux.org/alpine/v3.12/main: temporary error (try again later)
WARNING: Ignoring APKINDEX.2c4ac24e.tar.gz: No such file or directory问题 - Gin编译打包静态文件和模板文件
 如果在使用Gin框架编写web应用程序中,如果里面包含了模板文件和静态文件,我们如何进行打包呢?本文主要记录该操作。
 - Nginx搭建流媒体服务器
 最近关注流媒体服务器来做网络直播,本想使用阿里云的流媒体服务器,由于费用的问题还是想能否自己搭建一个流媒体服务器供自己测试使用。果不其然,Nginx居然如此强大,可以用来做流媒体服务器。本文将具体介绍流媒体服务器的搭建过程和使用过程。
 - Golang实现php的两个函数password_hash和password_verify
 Golang实现php的两个函数password_hash和password_verify
 - Laravel增加URL参数
 在做搜索列表分页的时候,需要分页后的页面跳转的url地址中包含搜索的参数,在Laravel中的如何处理呢?
点击排行
- VSCode插件 - 快速生成表格并格式化
 快速生成表格
 - Electron页面跳转、浏览器打开链接和打开新窗口
 Electron页面跳转、浏览器打开链接和打开新窗口
 - Electron打包错误“Error: Application entry file ..”解决方案
打包出现如下错误:Error: Application entry file "dist\electron\main.js" in the "D:\gui\demo2\build\win-unpacked\resources\app.asar" does not exist. Seems like a wrong configuration.
- Git保存和清除用户名、密码
 在使用Git的过程中,不想每次都输入用户名和密码去拉取代码,所以就需要保存这些信息,那么既然有保存了,就必须有清除功能。
 - mac git用户名和密码修改
 在Mac电脑中,如何对Git的用户名和密码进行修改呢?起初不懂Mac,所以整了很久,本文将记录如何对这个进行操作,以便后期使用。
 - Docker编译出现:temporary error (try again later)
Docker编译镜像出现:fetch http://dl-cdn.alpinelinux.org/alpine/v3.12/main/x86_64/APKINDEX.tar.gz
ERROR: http://dl-cdn.alpinelinux.org/alpine/v3.12/main: temporary error (try again later)
WARNING: Ignoring APKINDEX.2c4ac24e.tar.gz: No such file or directory问题